Surprising fact: the EPA reports floods are the most common natural disaster in the United States, and they often hit families without warning.
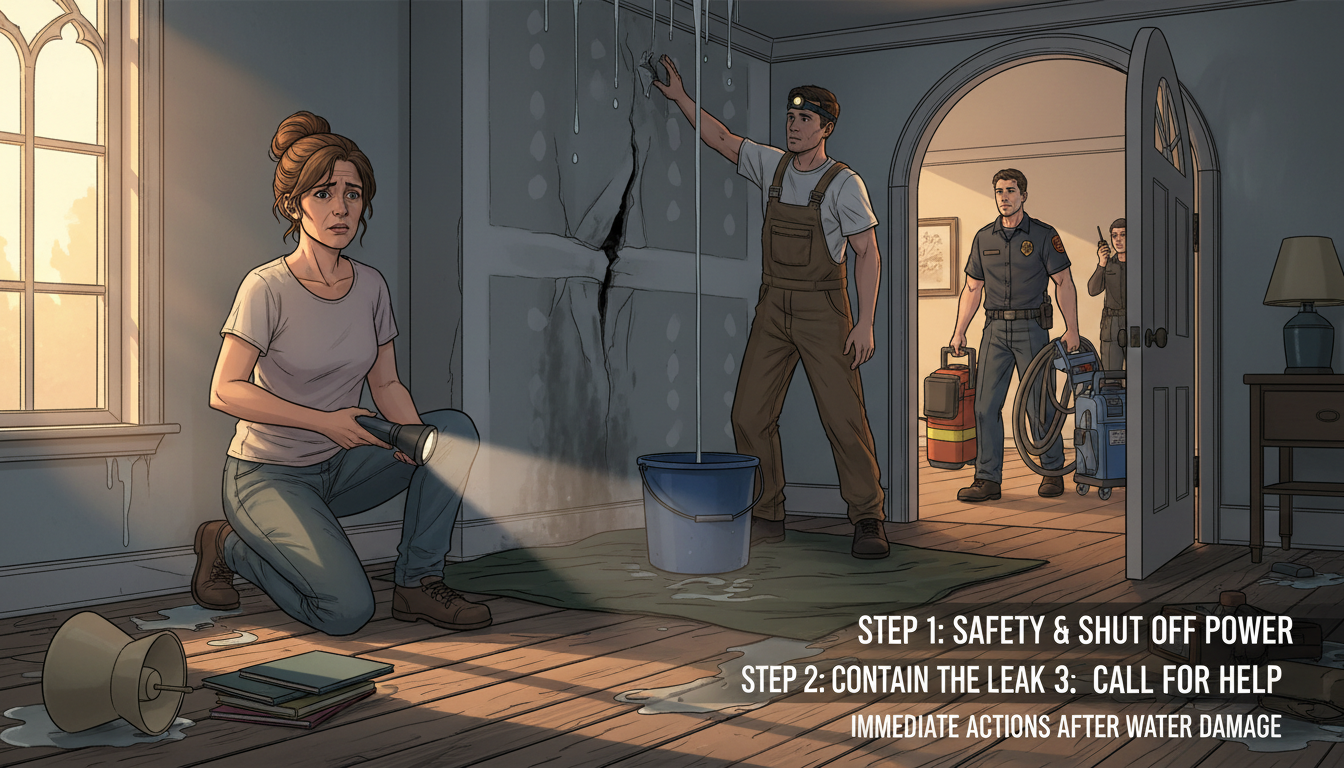
You need quick, calm action to protect people and property. Start by checking safety and turning off power at the main if it is safe for you to do so.
Document losses with clear photos and call your insurance company right away. Early contact speeds claims and helps fund the restoration process.
Professional water damage restoration crews use specialized gear for drying, mold prevention, and cleanup. Hiring a reputable company can cut long-term repair costs and reduce stress for homeowners.
Key Takeaways
- Prioritize personal safety before any cleanup efforts.
- Take photos and notify insurance as soon as you can.
- Begin drying fast to limit mold growth within 24–48 hours.
- Professional restoration often makes recovery faster and safer.
- Timely action reduces overall loss to property and structure.
Immediate Safety and Utility Shutdown
Start by securing the scene so you and others remain safe before any cleanup begins. Check the building’s structure first; HUD recommends confirming integrity before entry.
Electrical hazards are the top risk. If outlets or baseboards show standing water, do not enter. Turn off the main power only if you can reach the panel without stepping into wet areas.
Electrical Hazards
If the water level is above outlets, call a licensed electrician before proceeding. Never touch appliances while standing on wet floors.
Shutting Off Water Sources
Locate and close the main supply valve to stop further intrusion. Once the source is stopped, you can safely begin assessing the remaining damage.
Professional restoration teams always secure utilities and identify the primary source as their first step.
- Confirm structural safety before entry.
- Shut power at the main if safe to do so.
- Close the main water valve to halt flow.
- Call pros when outlets are submerged or the structure feels unsafe.
| Hazard | Action | Who | Why |
|---|---|---|---|
| Live electricity near water | Cut power at main or call electrician | You / Licensed electrician | Prevents shock and fires |
| Ongoing leak or flood source | Shut main water valve | You / Plumber | Stops further intrusion |
| Suspected structural harm | Await official inspection | Inspector / Restoration crew | Ensures safe entry and work |
Assessing the Scope of Water Damage
Scan ceilings, floors, and walls for signs of hidden moisture. Check for stained ceilings, warped flooring, or soft drywall. These visible clues point toward deeper issues.
Use proper tools. Restoration pros rely on moisture meters, hygrometers, and thermal imaging to find wet spots inside walls and ceiling space. A burst pipe can push moisture into framing and under flooring where you cannot see it.
Air quality matters. High humidity or a persistent musty odor often signals unseen mold growth. That smell is an early warning you should not ignore.
- Inspect every affected area, including under carpets and behind cabinets.
- Measure saturation with meters before removing materials.
- Call a pro if the wet area is larger than 10 square feet.
“A thermal scan often reveals moisture that visual checks miss.”
| Sign | Likely Cause | Immediate Action | Why |
|---|---|---|---|
| Stained ceiling | Leaky pipe or roof | Isolate area; inspect attic | Prevents ceiling collapse and mold growth |
| Warped flooring | Seepage from burst pipe | Measure moisture; lift flooring if needed | Stops structural rot and hidden spread |
| Musty odor | Hidden moisture / mold growth | Test air and surfaces; start remediation | Protects air quality and health |
Documenting the Damage for Insurance
Collect evidence with timestamps and notes before any cleanup begins. A clear record speeds claims and helps you get the most from your policy. FEMA notes that one inch of floodwater can cost more than $25,000 in property loss.
Capturing Evidence for Claims
Start with wide shots of each room, then close-ups of damaged items and structural harm. Use video where possible and narrate what you see aloud for timestamps.
Keep receipts for emergency repairs and store them with a written inventory of ruined items. Many homeowners find a restoration company can help create a detailed list that insurers accept.
- Take clear photos and short clips of affected areas and items.
- Contact your insurance company and submit the evidence you collected.
- Work with a reputable damage restoration team to document structural problems.
“A thorough photo log and receipts make claims smoother and faster.”
What to Do Immediately After Water Damage in Your Home Step by Step
Begin recovery by removing standing water and salvaging what you can safely carry.
Remove standing water first. Use pumps and wet vacs if you can. Moving wet items out speeds drying and lowers mold risk.
If carpeting, drywall, or insulation soaked through, you may need to cut drywall about a foot above the visible line. That preserves evidence for insurance while letting studs dry.
- Wear gloves, boots, and a mask for safety while removing porous materials and flooring.
- Set up fans and dehumidifiers right away. Rapid drying stops mold growth within 24–48 hours.
- Call pros for contaminated materials or when the affected area exceeds simple fixes.
| Action | Why | When | Who |
|---|---|---|---|
| Remove standing water | Prevents further structural loss | As soon as safe | You / Restoration crew |
| Cut out wet drywall/insulation | Allows studs and walls to dry | After photos for insurance | You / Contractor |
| Dry with fans & dehumidifiers | Stops mold growth | Immediately | You / Technicians |
| Document everything | Supports claims and repair planning | Before major removal | You / Adjuster |
If unsure, call a certified team. Professionals handle remediation, safe disposal of insulation, and a full restoration process. For local support, check a trusted water damage restoration resource.
Professional Restoration and Cleanup Techniques
An expert team follows a clear process that protects structure, contents, and air quality.
Water Extraction Methods
Pros use industrial-grade pumps and extractors to remove standing water from carpets, flooring, and wall cavities.
This equipment pulls moisture far faster than household machines and helps save items you thought were lost.
Drying and Dehumidification
After extraction, crews place air movers and dehumidifiers to lower moisture in the space.
If drywall or insulation cannot dry within 48 hours, they may need removal to prevent mold growth and further issues.
Sanitizing Affected Surfaces
Cleanup includes sanitizing surfaces to kill bacteria and limit mold growth. A common solution is half a cup of bleach per gallon of water applied with a pump sprayer.
Teams also check crawl spaces, ceilings, and walls for hidden moisture, then repair and replace damaged materials to finish the restoration process.
“Industrial drying and careful sanitizing make the difference between repair and long-term remediation.”
Long Term Prevention Strategies
Focus on fixes that stop intrusion and keep air dry throughout living spaces.
Regular inspections matter. Check gutters, roof lines, and pipes twice a year. Early finds of a small leak can prevent major water damage later.
Install practical retrofits. Backflow valves on sewer lines reduce sewage risk. Downspouts should discharge 5–10 feet from the foundation to keep water away from walls and flooring.
Basement protection is key. A sump pump with battery backup helps during storms. Keep ground sloped away from the foundation and seal cracks with proper insulation and caulk.
Control indoor humidity. Use dehumidifiers to hold levels at 30–50% and cut mold growth in ceilings, drywall, and other areas. After a burst pipe, consider plumbing upgrades to stop repeat issues.
- Schedule drainage and foundation inspection each year.
- Replace old pipes and damaged insulation when found.
- Address moisture quickly to avoid costly remediation and extended restoration.
“Small, routine steps keep your home safe and reduce long-term repair bills.”
Conclusion
Finish recovery with a checklist that keeps mold risk low and claims strong.
Act fast within the first 24–48 hours. Prioritize safety, capture clear photos, and call your insurer so the record is solid.
Professional water damage restoration teams bring the equipment and drying expertise needed for a lasting repair. They help with drywall removal, sanitizing, and the full restoration process.
Schedule an inspection, keep receipts, and plan routine checks to protect property. If you ever doubt safety, contact a trusted restoration company and let pros handle the tough work.