Did you know nearly 14,000 people in the U.S. face a water damage emergency every day? This fact shows how critical it is to know how to fix water damaged ceilings. Water damage can come from many sources, and finding the cause is key to fixing it right. I’ve learned that being proactive, like regular checks and using the right tools, can make a big difference.
Let’s dive into the world of water damage restoration and how to repair a water damaged ceiling step by step.
Key Takeaways
- Identifying the source of water damage is essential for effective repairs.
- Gathering appropriate tools and materials can streamline the repair process.
- Successful restoration requires thorough preparation of the workspace.
- Regular inspections help prevent future instances of ceiling water damage.
- Addressing issues early can save both time and money on extensive repairs.
- Properly drying affected areas is key to preventing mold growth.
Understanding the Causes of Water Damage
It’s important to know why ceiling water damage happens. This knowledge helps fix leaks and clean up water damage quickly. Many things can cause moisture in your home. Knowing these can help stop problems before they get worse.
Common Sources of Ceiling Water Damage
There are many reasons for ceiling water damage. Some big ones include:
- Overflows from sinks or tubs
- Leakage from faulty appliances such as dishwashers or washing machines
- Clogged gutters that prevent proper drainage
- Extreme weather conditions, including heavy rains or storms
Fixing these problems fast is key. For example, a clogged gutter can cause water to pool on the roof. If not fixed, this water can leak into your ceiling.
Signs of Water Damage to Look For
Spotting water damage early is very important. Look for:
- Brown or yellow stains on the ceiling
- Sagging areas or bulging materials
- Blistering or peeling paint
- Mold growth in damp areas
Finding these signs early helps fix leaks and avoid big cleanup jobs. It also saves money on repairs.
Assessing the Extent of the Damage
Checking a ceiling for damage needs careful eyes. First, I do a thorough look to spot stains, bulges, and color changes. This helps me see how bad the water damage is. It’s also key to find hidden moisture to fix it right.
I use both my eyes and special tools to get a full picture. This way, I can really understand what’s going on.
Visual Inspection Techniques
When I inspect, I look for important signs:
- Dark stains on ceilings or walls mean water might be getting in.
- Sagging spots could show water or structural problems.
- Peeling paint or wallpaper usually means there’s moisture under it.
Using Tools for Accurate Assessment
Along with looking, I use tools to dig deeper. Moisture meters show hidden water behind walls. If damage is big, I might need to make small holes to find the water.
| Inspection Method | Description | Benefits |
|---|---|---|
| Visual Inspection | Check for visible signs of damage like stains or bulging. | Quick and easy identification of surface issues. |
| Moisture Meter | Measures moisture levels in drywall and wood. | Helps locate hidden water pockets for more effective restoration. |
| Access Holes | Cut small holes to check for water intrusion. | Allows for direct assessment of structural conditions. |
Safety Precautions Before Starting Repairs
Before starting repairs on a water-damaged ceiling, safety comes first. The right steps ensure a successful fix and keep me safe.
Protective Gear to Wear
When fixing water damage, wearing the right gear is key. Here’s what I use:
- Gloves to protect my hands from sharp edges and debris
- Safety goggles to shield my eyes from dust and particles
- A mask to avoid inhaling harmful dust
These items help me work safely in any water damage restoration service.
Ensuring Electrical Safety
Water is dangerous, and it’s even more so with electrical systems. I always turn off the power at the breaker box first. This step is critical to avoid accidents.
Water can get into light fixtures, so I must check for live electricity before starting. This ensures my safety and lets me work on the ceiling without worry.
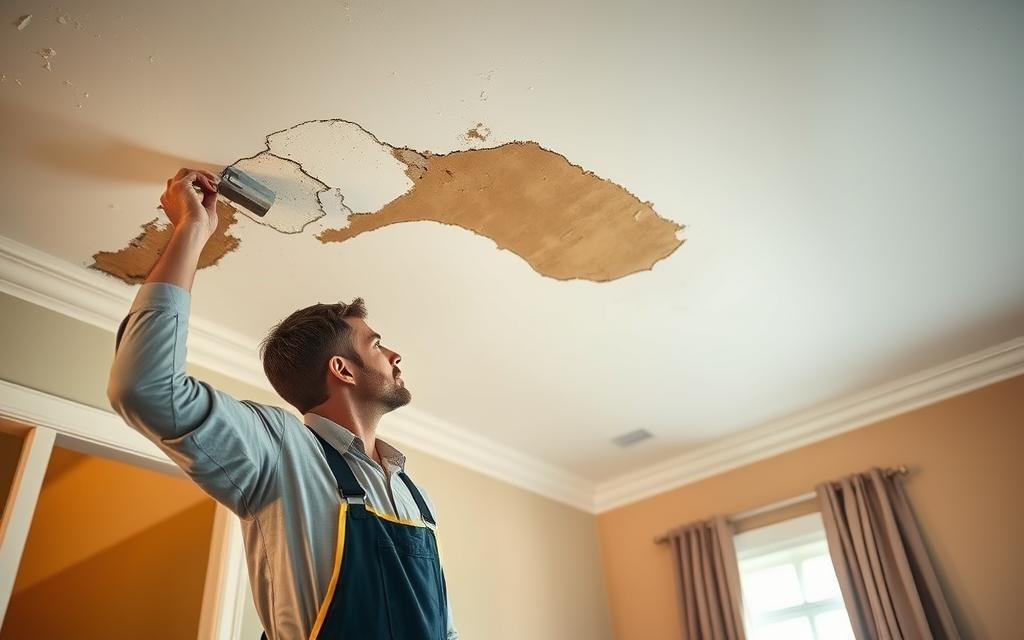
Steps for Repairing a Water Damaged Ceiling
Fixing a water damaged ceiling needs a careful plan to work well. I took steps to fix the ceiling, focusing on cleaning up water damage and restoring it. This approach helped me achieve a successful repair.
Removing Damaged Materials
The first step was to check and remove the damaged parts. I took out the wet drywall and insulation to improve airflow. Cutting out the bad spots helped dry the area behind the ceiling better.
This step is key in fixing water damage.
Preparing for Replacement
After removing the damaged parts, drying the area was next. I used fans and dehumidifiers to dry it faster. I checked for moisture by touching and using a moisture meter.
Once it was dry, I got ready to put in new materials.
Applying New Materials
The last step was putting in new drywall and paint. I measured and cut the drywall for a perfect fit. I used sanding and priming to finish it well.
This careful work made the ceiling look smooth and nice after fixing the water damage.
When to Consider Professional Help
Some situations need professional help, like when dealing with water damage. I found out that some signs show you need expert water damage restoration services. Knowing these signs can save you time and money.
Signs You Might Need an Expert
If you see any of these issues, it’s time to call for professional help:
- Widespread water damage that goes beyond a small area.
- Signs of mold growth or a musty smell.
- Repeated dampness in areas that were fixed before.
- Water pooling in specific spots, showing structural problems.
- Unusual health symptoms in people living there, possibly from mold.
Benefits of Hiring Professionals
Choosing professionals for water damage repair has many benefits:
- They have special tools and equipment for detailed assessments.
- Experienced technicians can accurately find out how bad the damage is.
- They offer quick water extraction and drying services.
- Professional services lower the chance of future problems, making your place safe.
- Experts can spot hidden issues that DIY efforts might miss.
Preventative Measures for Future Water Damage
It’s important to take steps to avoid ceiling water damage. Having a regular maintenance plan can really help. It lets you catch problems early, saving you time and money.
Routine Maintenance Tips
Here are some tips for keeping your place in good shape:
- Regularly clean your gutters to avoid water overflow.
- Inspect high-risk areas such as bathrooms and kitchens for leaks.
- Ensure that all appliances, such as washing machines and dishwashers, are functioning optimally.
- Apply waterproofing solutions to areas prone to moisture exposure.
- Invest in moisture sensors to alert you to any unexpected water activity.
Importance of Regular Inspections
Regular checks are key to spotting problems early. By looking for signs of wear, you can fix issues before they get worse. Knowing where to look can help you catch small leaks or damp spots before they become big problems.
For more information on fixing water-damaged ceilings, check out this resource. Taking preventative steps can greatly reduce the risk of serious water damage.
Conclusion: My Experience Fixing Water Damaged Ceilings
Looking back, I learned that catching water damage early is key. Quick action makes repairs easier and cheaper. Knowing where water damage comes from helps you act fast.
Preparing well and having the right tools made a big difference. It made me feel ready to face the challenge. If you want to learn more, check out this DIY project repair guide for tips on fixing ceilings.
If you love DIY, go for it but be careful. With the right skills and attitude, you can fix water damage and make your home safer. Fixing these problems not only makes your home more comfortable but also safer.